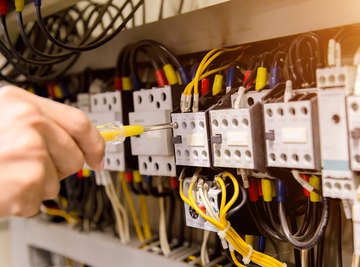
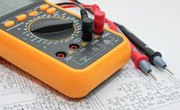
At first glance, multimeters are anything but simple. In addition to the symbols for standard measurements of electricity (volts, amps and resistance), your multimeter dial will have cryptic-looking symbols to represent DC and AC current, different sockets for plugging in the multimeter's probes, possible extra features like a continuity check or diode tester, and sometimes also scale measurements that range from the tiny to the enormous.
Warnings
Always, always – and by the way, did we say "always"? – consult your multimeter user's manual before connecting it to anything.
A Quick Recap on Volts, Amps and Ohms
Before you start fiddling with your multimeter, you should understand a few basic concepts about electricity:
Volts measure the voltage or amount of force "pushing" electrons through a circuit. If you use the common analogy of electricity as water flowing through a pipe, then volts would be the amount of water pressure.
Amperes (amps for short) represent the current, or how many electrons are flowing through a circuit. Using the water analogy, this would be the amount of water flowing through the pipe.
Ohms measure the amount of resistance in a circuit; the higher the resistance, the more the circuit slows down the electricity, much as a clog would slow down water flowing through a pipe.
Understanding the Symbols on Your Multimeter
Okay, back to those cryptic symbols on your multimeter dial. There simply isn't space to write out everything they represent, so the manufacturer uses abbreviations instead. Every multimeter is slightly different – and so, the instruction manual is always your best friend – but you can expect to see these abbreviations for measurements of electricity on most multimeters:
- Volts: V
- Amps: A
- Ohms: Ω
You might also see prefixes to help abbreviate very large (or very small) numbers. These are the same prefixes you'll see used to modify "benchmark" metric measurements like meters and grams:
- μ: The greek letter Mu; stands for "micro" or "one millionth"
- m: Stands for "milli" or "one thousandth"
- k: Stands for "kilo" or "one thousand"
- M: Stands for "mega" or "one million"
For example, 200 mV would be read as "two hundred millivolts," or be written out as 1/200,000th of a volt.
What About AC and DC Current?
Your multimeter will have different settings for measuring DC current (direct current) and AC current (alternating current), so they get their own symbols on the multimeter dial as well.
You may see alternating current signified with a squiggly line or tilde ~ that goes above or to either side of the unit symbol. The corresponding DC symbol is a solid or dashed line, — or - - -. So, for example, the symbol for alternating current amps could appear as ~A, A~ or Ã, while the DC voltage symbol would have a straight line (or combination of straight and dashed lines) beside or above the "V" for voltage. DC current flows in only one direction and comes from just about any item powered by a battery. AC current changes directions many times each second.
Your multimeter might also have the AC or DC letters either before or after "V" for volts or "A" for amps. For example, ACV/VAC for alternating current volts or DCA/ADC for direct current amps.
Warnings
Don't use your multimeter to measure wall outlets in your home – this type of high voltage is very dangerous.
Other Features on Your Multimeter
But wait, there's more. Your multimeter may have other functions including a continuity check, which gives a loud beep if two things are electrically connected or, to put it another way, if they form a complete circuit. The continuity symbol usually appears on your multimeter as a series of parallel arcs that look a like the standard "WiFi" symbol on your laptop or smartphone. If the circuit is complete your multimeter will beep; if the items you're testing aren't electrically connected, it'll stay silent.
Some multimeters can also check diodes, which are like one-way valves that only let electricity flow in one direction. (The typical diode check symbol looks like a stubby arrow with a perpendicular bar across its tip.) A few multimeters even have the capacity to test other electrical components such as transistors or capacitors. In each of these cases, consult your owner's manual for the details.
Setting the Dial on Your Multimeter
Once you understand the abbreviations and settings on your multimeter, you can start to actually use it. First, decide whether you're measuring volts (V), amps (A) or ohms (Ω), and whether your current is AC or DC, and then turn the dial to the appropriate setting.
If your multimeter is "auto-ranging," which means it automatically detects the scale of your measurements, its dial will be relatively simple. But if your multimeter is "manual-ranging," which means you have to give it a general idea of how big or small the measurements will be, each segment of your dial may be further subdivided into different scales or units of measure.
Because you want to be sure you're getting an accurate measurement, set the scale a little higher than you expect to read, but not so high that your reading will be an indiscernible blip at the bottom of the scale. For example, if you're measuring a 15 V circuit and your multimeter has 2 V, 20 V and 200 V settings, you'd choose the 20 V setting.
Using Your Multimeter: Connect the Probes
Your multimeter comes with cables that end in red or black probes. Much like the clamps on vehicle jumper cables, the red probe tip or clamp corresponds with the positive side of a circuit, while the black probe tip or clamp corresponds to the negative lead or side.
Your multimeter usually has a single, grounded socket for plugging in the black/negative probe (sometimes marked with "COM"), but it may have multiple sockets for plugging in the red/positive probe. Those sockets are labeled with the unit you're measuring (volts, amps or ohms) and may also be labeled with the scale – for example, there could be one socket for measuring volts and another for measuring millivolts. Always make sure you choose the socket that corresponds with the unit you're measuring, and that slightly exceeds the scale you expect.
How You Attach Your Multimeter
Once you have the probes connected to your multimeter and the multimeter dial is set correctly, it's time to connect your multimeter to the circuit you're assessing. How you make the connection depends on what you're measuring: To measure voltage, connect the probe tips to your circuit in parallel, touching or clamping the positive probe to the positive side of the circuit, and then the negative probe to the negative side of the circuit. (See Resources for an explanation of series and parallel circuits.)
To measure current or amps, disconnect the power source, attach your multimeter to the item being tested "in line" or in a series circuit and then reconnect the power source and check the circuit.
To measure the electrical resistance of an object in your circuit, disconnect the object completely from the circuit and any power sources, and then attach or touch the red and black probes of your multimeter to opposite sides or ends of the object.
Tips
Did your multimeter return a negative reading? You have your positive (red) and negative (black) probe tips in the wrong places. Try swapping them, and then check the reading.
References
- Northwestern University Qualitative Reasoning Group: What Are Volts and Amperes?
- Science Buddies: How to Use a Multimeter
- Calco Electronics: How to Measure Volts, Amps, Watts, & Ohms With a Multimeter
- Georgia State University: HyperPhysics: Ohm's Law
- Owlcation: How to Understand Electricity: Watts, Amps, Volts, and Ohms
Tips
- Test the meter for proper functionality by testing known voltage, current and resistor sources.
Warnings
- All meters have different maximum limitations to what they are able to measure; familiarize yourself with these before use.
About the Author
Lisa studied mathematics at the University of Alaska, Anchorage, and spent several years tutoring high school and university students through scary -- but fun! -- math subjects like algebra and calculus.