How To Build A Spinning Jenny Paper Model
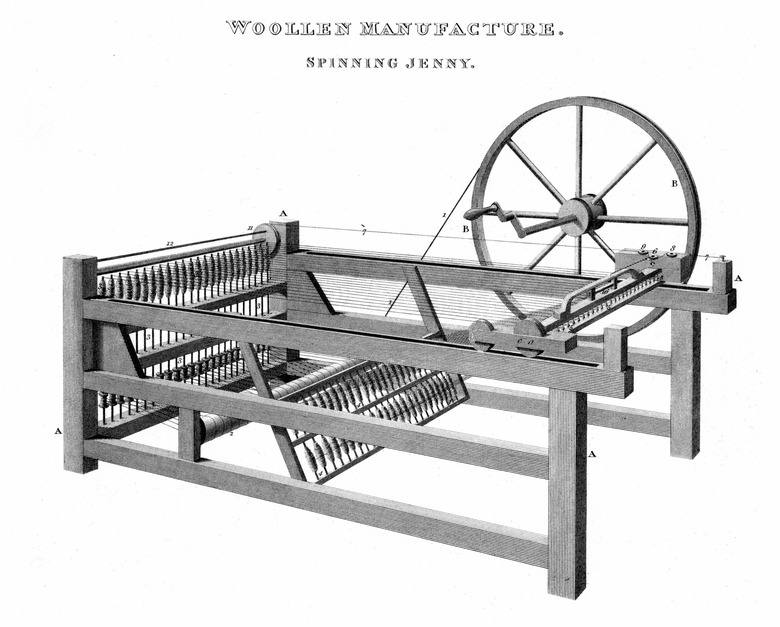
The Industrial Revolution was a time of great change during the 18th and 19th centuries, when mechanization and technological development altered the social, economic and cultural development of the world. Some of the most significant improvements of this time related to the textile industry and the processing of cotton. For example, the spinning jenny, invented in 1767 by James Hargreaves, increased the amount of yarn that could be spun into thread. The machine was simple and based on the same concept as the spinning wheel but permitted the operator to make several bobbins of thread at once. You can make a non-operational model of this important device using paper and thread.
Step 1
Roll eight paper tubes the same diameter as a pen. Lay a sheet of paper on a flat surface horizontally. Spread glue over the entire surface of the paper. Roll the paper from bottom to top, forming a tight tube. Tape the edge of the tube down with clear tape.
Step 2
Roll three sheets of paper into narrow tubes half the diameter of the eight larger tubes. Glue and tape the paper so that the roll stays together. Roll the paper around a skewer to help keep the tube tight.
Step 3
Cut the narrow tubes into three 2 1/2-inch lengths. Keep the 1-inch remnant from each sheet. Cut two of the larger tubes into four 4-inch lengths. Discard the 1/2-inch remnants.
Step 4
Cut several 1/4-inch and 1/2-inch wide strips of paper, 3 inches long.
Step 5
Mix 2 parts glue and 1 part water in a bowl to make a basic papier mache paste.
Step 6
Lay three of the larger tubes parallel to one another, about 2 inches apart. Place one 4-inch tube on each side of the large parallel tubes to form a rectangle. One of the longer tubes will cut across the center of the rectangle.
Step 7
Dip the strips of paper in papier mache paste. Wipe off excess paste so that the strip is moist but not dripping. Lay the strips over the places where the tubes connect, as if taping the corners. Let it dry for an hour. Flip over the rectangle carefully and repeat this step; let it dry for another hour. Raise the rectangle on its side and wrap each corner thoroughly, bringing paper around, through and over each of the joints.
Step 8
Repeat Steps 6 and 7 to make a second rectangle of the same size. These are the side walls of the spinning jenny.
Step 9
Hold the rectangles parallel to form the sides of the spinning jenny. Tape one of the narrow tubes between the rectangles to form the back wall of the jenny. Tape the tube in place 1 inch from the top corner of the rectangles. This narrow tube will be 1 inch above the center of the rectangles.
Step 10
Tape two more narrow tubes to the jenny, spaced 1 inch apart beneath the first tube. Wrap the tape with papier mache strips to strengthen the joint and hide the tape. The jenny will now have two long side walls and a narrow back wall.
Step 11
Glue a narrow tube between the top rung of the side walls parallel to the back wall. Place the tube about 3 inches away from the back wall. Glue a second tube between the middle rung of the side walls, parallel to the back wall, and 3 1/2 inches from the back wall. Glue a third narrow tube between the lowest rungs of the side walls, parallel to the back wall, and 4 inches from the back wall. These bars form the beams where the unspun fiber, rovings, are held.
Step 12
Cut a 3-inch circle out of a thick paper such as oak tag. Use the rim of a cup to draw the circle. Cut out triangular sections from the interior of the wheel so that six or eight rungs remain and the wheel resembles a wagon wheel with spokes.
Step 13
Bend the tip of one of the narrow 1-inch remnants to form an L. Glue the longer arm of the L to the center of the wheel to form a handle. Glue the wheel to the right side wall of the jenny so that the handle points toward the opposing wall.
Step 14
Glue two of the narrow tubes side-by-side. Glue this piece to the jenny parallel to the back wall, near the wheel to form the mechanism that clamped the thread.
Step 15
Wrap thread around one of the narrow 1-inch remnants to form a bobbin with spun thread. Glue the bobbin upright to the top rung of the back wall. Drape the thread between the bobbin and the clamp to represent the spun yarn. Repeat with the other 1-inch remnants and more thread to make more bobbins.
Things Needed
- Glue stick
- Clear tape
- Skewer
- Scissors
- Ruler
- Glue
- Bowl
- Oak tag
- Cup
- Thread
Cite This Article
MLA
Cini, Sylvia. "How To Build A Spinning Jenny Paper Model" sciencing.com, https://www.sciencing.com/build-spinning-jenny-paper-model-10018126/. 24 April 2017.
APA
Cini, Sylvia. (2017, April 24). How To Build A Spinning Jenny Paper Model. sciencing.com. Retrieved from https://www.sciencing.com/build-spinning-jenny-paper-model-10018126/
Chicago
Cini, Sylvia. How To Build A Spinning Jenny Paper Model last modified March 24, 2022. https://www.sciencing.com/build-spinning-jenny-paper-model-10018126/