How To Do A Step-By-Step Geometry Proof
Geometry proofs are probably the most dreaded assignment in high school mathematics because they force you to break down something you may understand intuitively into a logical series of steps. If you experience shortness of breath, sweaty palms or other signs of stress when you are asked to do a step-by-step geometry proof, relax. Here is a short walk-through of a geometry proof that will help you survive beginning geometry.
Step 1
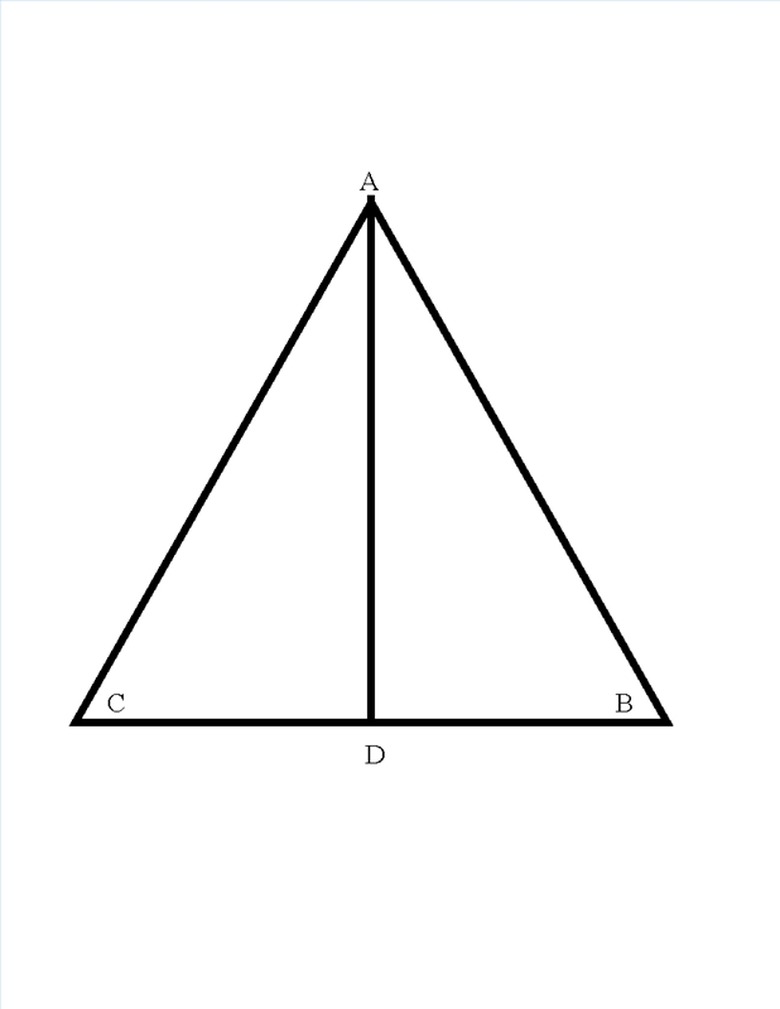
Read the problem carefully. For the purposes of this step-by-step geometry proof, use the following example: Given that triangle ABC is an equilateral triangle and that line AD bisects line BC, prove that the resulting triangle ABD is a right triangle.
Step 2
Draw an illustration of the problem. Having a picture in front of you when doing a geometry proof really helps organize your thoughts.
Step 3
Consider what you know about each piece of given information. For example, because ABC is an equilateral triangle, all three sides must be the same length. Furthermore, all three angles must be equal as well. Since a triangle contains 180 degrees, then each angle in an equilateral triangle must measure 60 degrees. Moving on to the other piece of given information, since line AD bisects side BC, that makes line segments CD and DB equal in length.
Step 4
Use the facts established by the given information to generate more facts that are useful to your geometric proof. Since the line segments CD and DB are equal in length, that means the angle CAD must be equal to the angle DAB.
Step 5
Extrapolate from the facts to get closer to the solution. Since angle A is 60 degrees, the smaller angles must be one half of 60, or 30 degrees. Given that angle B is 60 degrees and that angle DAB is 30 degrees, this accounts for 90 degrees of a triangle. The remaining 90 degrees must be contained in the angle BDA. Since a right triangle must contain a 90-degree angle, you have just proven that triangle ABD is a right triangle.
Step 6
Write out the step-by-step geometric proof of the problem in a two-column format. In the left hand column, write a statement and in the right hand column, write the proof of the statement. Repeat this process until you have documented all of the steps in your thinking process that resulted in your solution.
TL;DR (Too Long; Didn't Read)
Keep a math textbook handy while doing proofs to look up properties of lines, angles and shapes. If you are really stuck on a proof, go back to the beginning and start from scratch. You may be making an incorrect assumption about some basic elements of the problem. There are usually several ways to solve a geometry proof. Some will be quicker than others.
Warning
Doing geometry proofs makes your eyeballs bleed. Just kidding.
Cite This Article
MLA
Mains, Eric. "How To Do A Step-By-Step Geometry Proof" sciencing.com, https://www.sciencing.com/do-stepbystep-geometry-proof-2314091/. 24 April 2017.
APA
Mains, Eric. (2017, April 24). How To Do A Step-By-Step Geometry Proof. sciencing.com. Retrieved from https://www.sciencing.com/do-stepbystep-geometry-proof-2314091/
Chicago
Mains, Eric. How To Do A Step-By-Step Geometry Proof last modified August 30, 2022. https://www.sciencing.com/do-stepbystep-geometry-proof-2314091/

