Homemade Electrical Transformers
An electrical transformer changes the current and voltage levels in an alternating circuit using magnetic induction. You can make a homemade transformer with simple tools. No need to have the sort of fancy, box-shaped iron core shown in science textbooks. Instead, you just need an alternating current to induce the magnetic field in magnetizable material between the primary and secondary circuits. The primary circuit provides the alternating current to the secondary circuit via the magnetizable material in between.
The Overall Structure
The Overall Structure
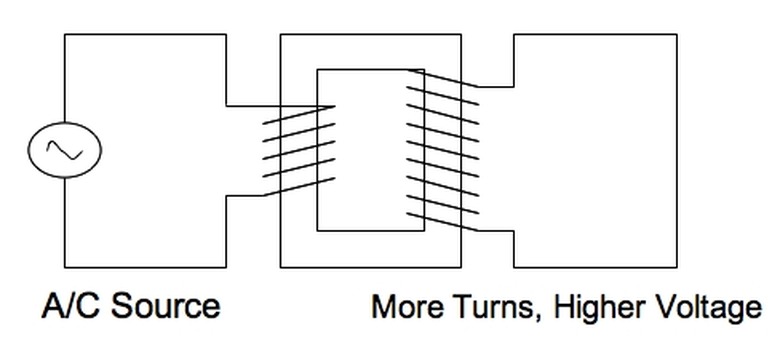
The transformer has three parts. There are two circuits, with some magnetic material in between that connects them. The circuit connecting to the AC source is called the primary circuit. The circuit on the other side of the magnetic material is called the secondary circuit. Current through the secondary circuit is induced by the primary circuit through the magnetic material.
The two circuits are connected to the magnetic material by being coiled around different parts of it (see diagram). The primary circuit induces a magnetic field in its coil, which the magnetic material conveys to the secondary coil. This in turn creates an alternating current in the secondary coil.
A resistor should be inserted somewhere in the circuits, to prevent the currents' flowing so fast that your house's electrical system is damaged. (Here, we use a light bulb as the resistor.) And children should not attempt this without adult supervision.
The Primary Circuit
The Primary Circuit
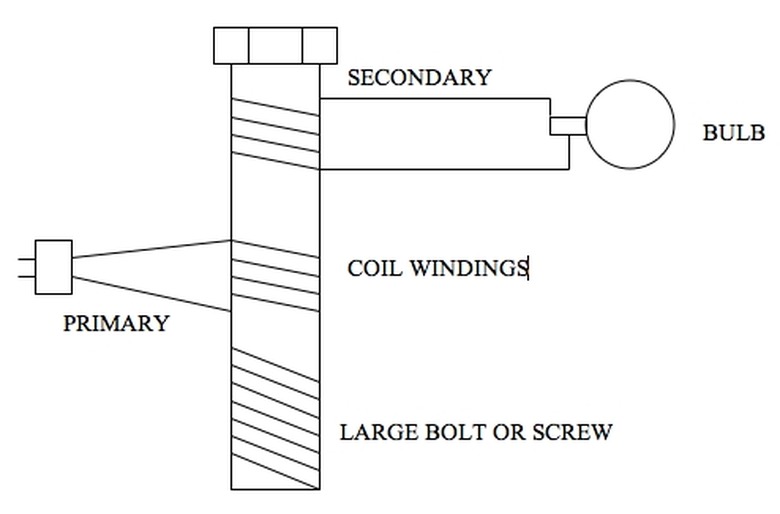
An alternating current is needed for the primary circuit. A wall socket would suffice. To access its current, you can use an old lamp cord. To make the circular circuit, you'd need to separate the two wires of the lamp cord. One of the free ends is then wrapped around the magnetizable material. A large bolt or screwdriver can be used. To make sure the metal is magnetizable, test to see if a kitchen magnet sticks to it.
Once one end is coiled around the screwdriver or bolt, it can be attached to the other wire of the cord to complete the loop (see diagram). In fact, if you plug it in now, the screwdriver/bolt should work as an electromagnet.
Warning: Make sure the wire is coated all along the circuit. Bare wire should be covered with electrical tape. You don't want to risk a short or a shock. Also, the coil won't work right if it's wound with bare wire.
The Secondary Circuit
The Secondary Circuit
Use another wire for the secondary circuit. The wire should be coated for the same reasons the primary is. Coil the secondary wire around the bolt or screwdriver. Then attach the bare ends of the wire to the two terminals of a light bulb. (The two terminals of a light bulb are the metal screw threading and the metallic tip.)
Electrical tape may be needed to avoid crossing bare wires.
The transformer is now complete. You can insert the plug of the primary circuit into a wall socket after a last-minute check for overlapping bare wiring. If you smell any burning, remove the plug immediately. Either bare wires are crossed or another resistor needs insertion, for example, a light bulb in the primary circuit.
Changing the Bulb Brightness
Changing the Bulb Brightness
Changing the number of windings per coil will change the voltage ratio between circuits. The more windings the secondary circuit has compared to the primary, the greater the voltage and the lesser the current of the secondary circuit. Since power lost through a resistor equals current-squared times resistance, the bulb can be made to brighten by lowering the voltage and increasing the current, that is, by increasing the secondary winding count.
Cite This Article
MLA
Dohrman, Paul. "Homemade Electrical Transformers" sciencing.com, https://www.sciencing.com/homemade-electrical-transformers-5489862/. 24 April 2017.
APA
Dohrman, Paul. (2017, April 24). Homemade Electrical Transformers. sciencing.com. Retrieved from https://www.sciencing.com/homemade-electrical-transformers-5489862/
Chicago
Dohrman, Paul. Homemade Electrical Transformers last modified March 24, 2022. https://www.sciencing.com/homemade-electrical-transformers-5489862/

