How To Make An Alternator
You can build a simple Permanent Magnet (PM) alternator with just a few items. This is an excellent way for a beginner to learn about electricity and motors. By following these simple steps, you will have a working PM alternator that you can use to recharge batteries or run small electronics projects.
Step 1
Take a coffee can lid and trace the rotor size in the center. Hold the disc against the rotor perpendicular to the motor and check that you have it directly centered. Do not attach the disc–lay it flat on your work surface.
Step 2
Take your magnets and arrange them around the disc fairly evenly spaced apart. Now turn the magnets so that the pole of each magnet alternates with the pole of its neighbor. Put a small drop of glue on the metal disc near the edge, and place your first magnet. The edge of your magnet should be flush with the edge of the disc. Let the glue dry so the magnet is firmly held in place. Take your shim material and experiment with various layers of shims until you are sure that if you were to hold the shims against the first magnet you placed and then put down the next magnet, that you could repeat that process until all 14 magnets are placed on the disc evenly spaced. When you are sure you have the right amount of shims to do this, glue the rest of the magnets around the edge of the rim. You can use a glue accelerator to speed the process. Make sure the poles remain in their alternating position.
Step 3
Glue the disc to the rotor, or use several small, strong magnets to attach it. You can turn the motor on and test to see that the disc will remain attached to the rotor as the engine turns.
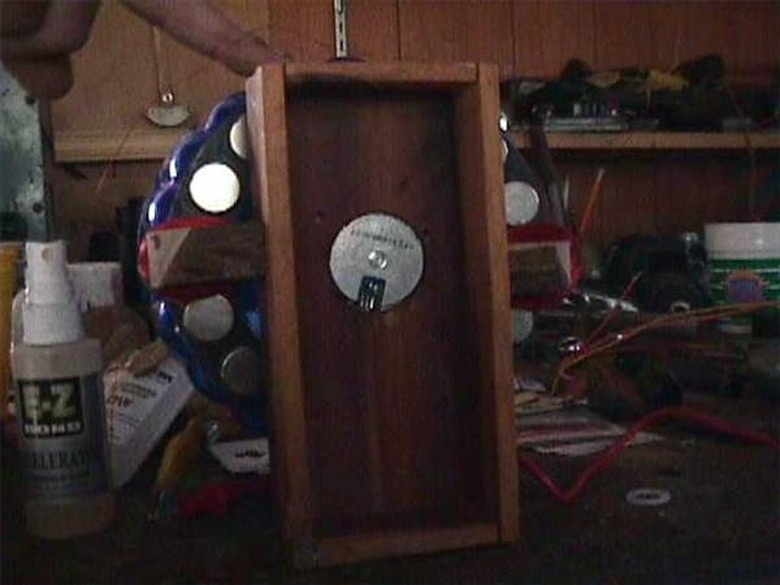
Step 4
Take your small wood frame and mounting hardware and mount your motor to the center so the rotor can spin the magnet disc freely. Your frame should be large enough that you can place your wooden blocks near the spinning disc but not be touched by it. The frame can either lie flat, or you can make a stand to hold it upright.
Step 5
Using the hand-held coil winder, wind two coils of about 400 turns each of the magnetic wire. Make sure you leave both ends of the wire free, and strip the covering off them–this will be how you connect the coils. Once you have your coils, drip superglue onto them and let this dry.
Step 6
Take your small block of wood and mount your first coil by gluing it flat to the wood. Place the block onto your wood frame. You will want to make sure to test that your magnet wheel can spin freely over the coil; the most space you want between your magnet and coil is about 1/8 of an inch. When you are sure that it is positioned correctly, glue the block onto the frame. Glue your second coil to a block of wood. Turn the magnet wheel so one of the magnets is centered directly over the first coil. Hold the wheel firmly in place and glue the second block into position so it is centered directly below a magnet. It does not matter where on the wheel you place your second coil.
Step 7
Connect both coils together by taking one wire from each and splicing it together. You can attach the second wire to the object that will receive the electricity generated by your alternator. For now, take your multimeter and attach it to the free wires, get a reading of the voltage being generated and experiment with the placement of the coils until you are satisfied with their output.
Things Needed
- Small DC hobby motor
- Rotor (sized to attach to the motor)
- Hand-held coil winder
- #30A WG enameled magnet wire
- Coffee can lid
- 14¾-inch diameter by 1/8-inch thick grade N-35 neodymium-iron-boron magnets
- Shims (wood, plastic or metal)
- Superglue
- Glue accelerator (optional)
- 2 small wood blocks
- Square wood frame
- Mounting hardware
- Multimeter
TL;DR (Too Long; Didn't Read)
When placing the magnets, hold the magnet you are getting ready to glue in place over the one you just glued to make sure that the poles are repelling each other. This will insure that you are alternating poles as you place the magnets.
Warning
The magnets used in this project are powerful, so use caution in handling them as they may come together quickly, pinching you and possibly tearing your skin.
Cite This Article
MLA
Tribe, Cassandra. "How To Make An Alternator" sciencing.com, https://www.sciencing.com/make-alternator-4740911/. 24 April 2017.
APA
Tribe, Cassandra. (2017, April 24). How To Make An Alternator. sciencing.com. Retrieved from https://www.sciencing.com/make-alternator-4740911/
Chicago
Tribe, Cassandra. How To Make An Alternator last modified March 24, 2022. https://www.sciencing.com/make-alternator-4740911/