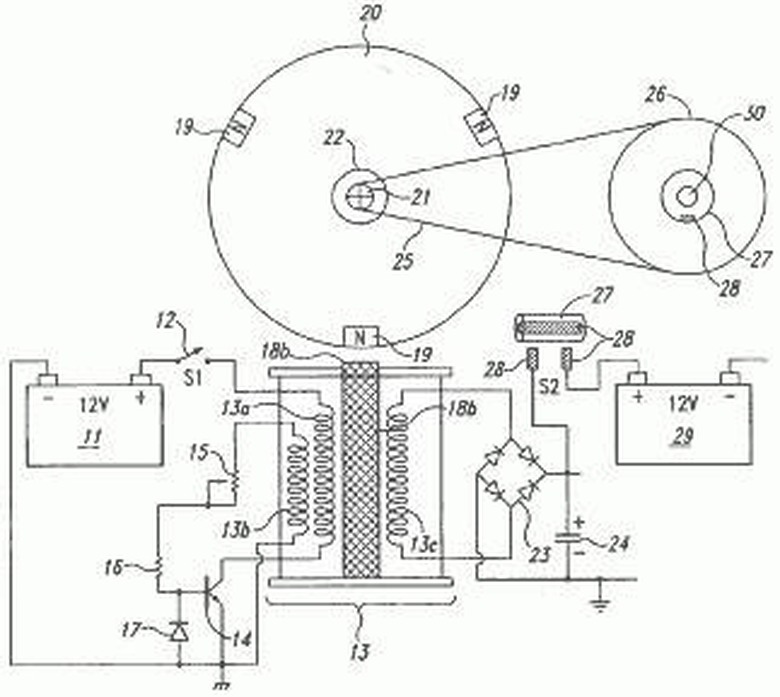
How To Make A Bedini Motor
You don't need to be an expert in electronics to build a Bedini motor. This free energy generating machine, invented by John Bedini, is a great project for a beginner who wants to learn about electronics. Follow these steps and you will be able to construct a working Bedini motor on your kitchen table.
Step 1
Build your electromagnetic coil first. Unwrap both wire spools and pull the ends free. Join the two wires together and twist so they wrap around each other and form a double wire. Pass the double wire through the anchor hole in the empty coil and hold in place securely. Wrap the double wire around the empty spool in a single layer from one end to the other. When you get to the bottom, start wrapping in the opposite direction as neatly as possible to make another layer. Repeat this process until the layers fill the entire spool. On the coil that you made, make sure that you have two wires coming from the top of the coil (one 22 gauge and one 26 gauge) and the same coming from the bottom.Take the welding rods and cut to match the length of the core. Fill the core with as many welding rods as you can and super glue the rods together.
Step 2
Attach your rotor to the rotor mount according to the instructions that came with the rotor kit. Place the rotor so it can spin freely with the magnets passing directly over the core of your electromagnetic coil. Use wood or plexiglass as a stand to hold your electromagnetic coil and rotor in place.
Step 3
Now, connect your diodes to your transistor. Place your transistor with the poles up and closest to you. The pole on the left is the emitter (E) and the pole on the right is the base (B). The body of the transistor is called the collector (C). Place the 1n4001 diode between the poles of your transistor and connect with the strike of the diode pointing towards the B pole. Connect a 430 ohm resistor off the B pole and connect the free end to your potentiometer. Connect the 1n4007 diode to the point nearest to you on the collector (C).
Step 4
Cut five lengths of wire. Connect one to the free end of your 1n4007 diode. Connect two lengths to the E pole of your collector. Connect one wire to the collector at the point furthest away from you. Connect one wire to the potentiometer.
Step 5
Take your two batteries and attach one wire from the positive pole of the recharging battery, one wire from the negative pole of the "starting" battery. Connect the negative pole of the recharging battery to the positive pole of the starting battery with one wire and splice a second wire into the middle of that wire (allowing for a connection in). Now, connect one of the top 22 gauge wires from your coil to the wire you just spliced into the connecting wire between the batteries. Connect one of the wires coming from the emitting pole of the collector to the wire of the negative pole of the starting batter. Connect the wire from the 1n4007 diode to the wire coming from the positive pole of the recharging battery.
Step 6
Now you are ready to finish connecting your motor. Connect the remaining free wire coming from the emitting pole of the collector to the bottom 26 gauge wire of the coil. Then connect the wire from the potentiometer to the top 26 gauge wire of the coil. Connect the last free wire of the collector to the bottom 22 gauge wire of the coil.
Step 7
Finally, take the small neon light and attach to the emitter pole and one to the collector body.
Things Needed
- Two 12 volt rechargeable battery (car batteries)
- Spool of uncovered 22 gauge wire
- Spool of uncovered 26 gauge wire
- Empty wire spools
- Wood or plexiglass
- Welding rods
- Super glue
- Rotor with magnets
- Rotor mount
- 2n3005 transistor
- 1n4001 diode
- 1n4007 diode
- 430 ohm resistor
- Potentiometer
- Small neon bulb (triggered at 90 volts)
TL;DR (Too Long; Didn't Read)
Make room on a table or other flat surface to work.
Your electromagnetic coil should have at least 450 coils of the doubled wire on it. A simple way to do this is pull 100 feet free from each spool, secure the ends of the spool firmly so you can stretch out the wire full length, braid the ends together around an electric drill and turn it on.
Wrap your coil in a tight, non-conductive covering like plastic to keep the wires tight on the spool.
Warning
The neon bulb should not light up when you run your motor. If it does, shut down the motor immediately because it is producing enough voltage to "melt" your transistor.
Make sure the batteries you use are in good condition and have no leaks, cracks or other damage to the casings as the materials inside batteries are explosive.
Always have a fire extinguisher handy and work in a well lit and ventilated area.
Cite This Article
MLA
Tribe, Cassandra. "How To Make A Bedini Motor" sciencing.com, https://www.sciencing.com/make-bedini-motor-4704703/. 24 April 2017.
APA
Tribe, Cassandra. (2017, April 24). How To Make A Bedini Motor. sciencing.com. Retrieved from https://www.sciencing.com/make-bedini-motor-4704703/
Chicago
Tribe, Cassandra. How To Make A Bedini Motor last modified March 24, 2022. https://www.sciencing.com/make-bedini-motor-4704703/
